The playroom makeover is done and dusted, and I've moved on to pastures new (gross, grubby pastures, in the form of our ensuite bathroom), but before I let you in on my plans for that and how it's going I thought you might be interested in a little update we did on the Latt table and chairs we have for the kids.
Showing posts with label Hacks. Show all posts
Showing posts with label Hacks. Show all posts
Wednesday, 6 July 2016
Sunday, 22 May 2016
simple billy bookcase update
Yes, I've told you guys many, many times that the playroom reveal was on it's way, and yes, it turned out I was lying, but this time I mean it, I promise!!!!!
Everything in there is finished, I'm just waiting on one decal to arrive and then I can photograph the whole thing for you. I swear!
In the meantime, I thought I'd share a quick little idea for jazzing up a bookcase with you.
Friday, 26 June 2015
Ikea-hack for built-in dining room storage...when you have to work around a radiator.

Have you heard the expression "work will expand to fit the time allowed"? Well I have that problem, except it's stuff that expands around here. Stuff that fills every nook and cranny and falls out of cupboards to hit you in the face when you're already in that delicate pre-coffee stage of the morning and could really do without it.
True story
We used to live in a two bedroom apartment. It was not big. It seemed spacious when we moved in but then we...moved in, and realised there was pretty much no storage. It was like the anti-tardis.
And while we were a bit cramped as Emilia was growing and the toys were apparently pro-creating while we were asleep, we managed.
The bath in the guest bathroom was full of boxes, but we managed!
So when we moved into our new, four-bedroom house complete with playroom, utility room, attic and shed I was expecting us to be rattling around in practically empty rooms. I thought I'd have to making shopping for ornamental things a priority, I envisioned clearing out the local charity shops, collecting all the lovely decor items I had been eyeing throughout our search for a home in a desperate bid to fill empty space and make the place look lived in....
What actually happened was we moved in, and the day after we unpacked all the kitchen stuff we were back to piles of lidless storage boxes and brightly colored plastic cups exploding out at us every time we opened a door.
Kid plastic - getting it on in your kitchen cupboards at night.
On reflection, our new kitchen doesn't actually have any more cupboard space than our old one did (there goes my dreams of open shelving on top), and now that we actually have enough chairs to have people over for dinner we've bought all the stuff that goes with entertaining, wine glasses, extra plates, side plates....basically just normal kitchen stuff but it's a lot more than the mis-matched mugs and stolen pint glasses that we used to make do with!
So, we needed storage. Specifically storage for the non-everyday items like wine glasses and fancy tea cups that were really only going to be needed every now and again (doing without them was not an option, I'd waited long enough, fancy table-settings would be mine!)
The obvious place was this blank wall in the dining area, and it would have been great to just be able to do a full built in, cupboards on the bottom, shelving up to the ceiling, something like this....
 |
| Centsational girl |
Or this...
But alas, we were working with a radiator on that wall, so we couldn't just stick a few Billy's in there with doors on the bottom and call it done, we were going to have to try and come up with something that disguised the ugly radiator but still left it functional, while adding storage either side and above, but still looking like a built in....easy!
So we figured the best thing to do was try and cover the radiator, add cupboards either side, and put some open shelving above (you can see the post about those shelves here). The idea was to make it look kinda like a modern version of a dresser, but to keep it open by having space either side of the cupboards and around the shelves to stop it taking over the room. The room isn't huge and anything too bulky would have made it look very cramped I think.
So we bought two of these Billy bookcases....
 |
| Billy bookcase €15 |
And the doors to match.....
 |
| Oxberg door €20 |
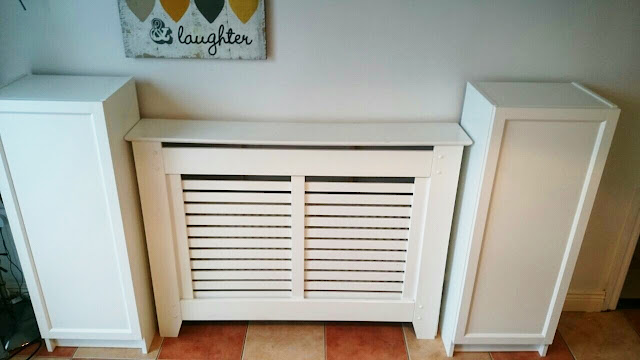
Luckily there was a radiator cover in the utility room when we moved in,and it was a perfect match for the color of the Billy bookcases, so we started with that.
*If you aren't lucky enough to have a radiator cover in the perfect shade lying around they're really inexpensive in any good diy store, you can even just buy the front paneling (you won't need the rest for this project) and save even more that way.
*If you aren't lucky enough to have a radiator cover in the perfect shade lying around they're really inexpensive in any good diy store, you can even just buy the front paneling (you won't need the rest for this project) and save even more that way.
Gavin removed the top and replaced it with a piece of pine board stained to match the shelves. This brought the cover out further than it was originally, bringing it in line with the bookcases.
We (i.e Gavin, I was basically just the idea's-man on this project) then took off the skirting board (a.k.a trim for the American's!) in order to get the whole thing flush against the wall. He also had to cut holes in the sides of the bookcases to make room for the radiator pipes.
*side note~the trim was grouted to the floor. Whoever built this house first installed it too low for the tiles to fit underneath, and then instead of fixing it just went ahead and laid them right up to it. This is the only wall where this happened. Seeing the shoddy work done by builders in this house makes me really confident that at the very least we can't do any worse ourselves!
So we now had two small Billy's with doors attached and a radiator cover all screwed together and attached to the wall. To make it look like one piece we added a top of stained pine to everything. I didn't varnish the tops as I liked it looking a little bit rough and rustic, and we did two coats of walnut stain on all the pieces.
We added the same cup pulls as we used on the Rasts we have in the bedroom but they're just doing the job until the ones I ordered arrive. These obviously will be sprayed gold.
That's just how I roll

We then added the open shelving above, and those were treated the exact same way as the pine tops below.
 |
| Can we just take a second to talk about the fact that I bought fruit specifically to stage a photo? I feel like that must be some kind of a blogger right of passage. |
 |
| Approximately 0.5 seconds after I put the fruit out.... |
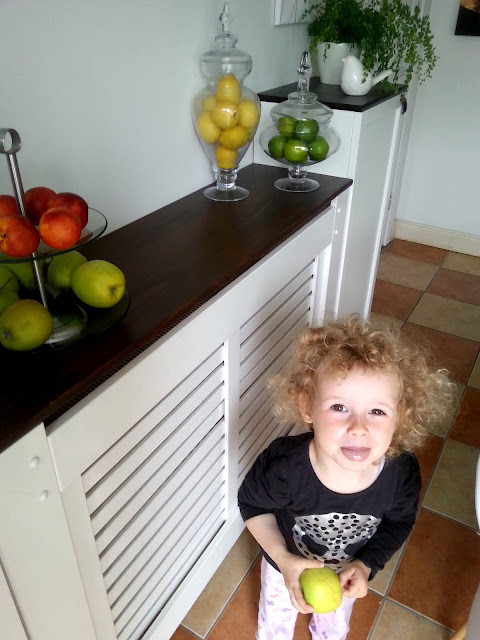 |
| The cheek! Also, note to self: at some take photo of crazy-haired child with slightly less crazy hair. I do groom her occasionally, honest. |
So there you have it. I'm pretty much in love with them, they somehow make the room look bigger, I guess cos the shelves draw your eye up and make the ceiling look higher? I dunno, I'm no expert, I just know that they look great and they store all the ridiculous things I rarely use but MUST have, like dessert glasses and fancy teacups...
The heart wants what the heart wants.
We do need to move the light on the left now, but that's a small job. We needed to move the table back slightly to center it with the cupboards so now the lighting is slightly off.
So basically what I'm saying is this light is probably going to stay like this for all eternity. Bygones.
How many plants in one room is too many do you think? It's starting to look a bit like an oxygen farm in here.
The whole thing ended up costing €160, including the shelves, materials etc, and it's really cut down the amount of things that fall on me in the mornings, so I'm pretty happy with it!
What do you think? Ever "hacked" anything? Bought fruit for a photo? Been caught in a plastic-cup tsunami? I'd love to hear about it in the comments ;)
Linda xx
If you liked this post you might also like:
Tuesday, 9 June 2015
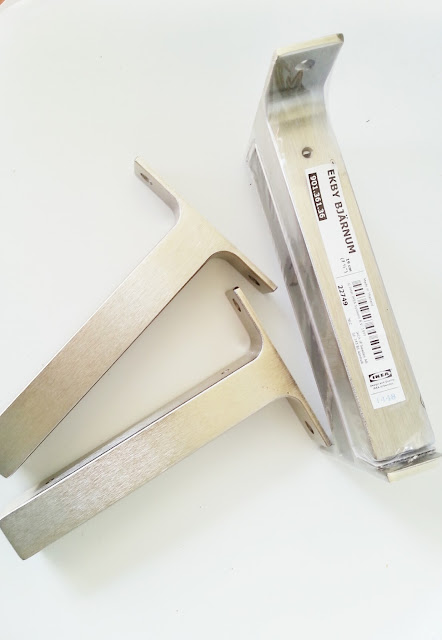
Ikea Ekby Bjarnum shelves...with a twist!
It seems like everywhere I look at the moment there are kitchens that have done away with the upper cupboards and have instead beautifully styled open shelving for storing and displaying those items in the kitchen that are just too pretty to hide away!
I love this look, and I would happily rip out the upper cupboards in mine right now, but alas, I don't think my collection of well used plastic cups and baby bottles would look as good, no matter how I styled them! :P
Also, at the moment we just need every inch of storage we have for food, pots and pans etc, there is no room for pretty displays in this house........or was there?
We had a blank wall behind the dining table that had a radiator on it...
*side note-if I'm ever lucky enough to get to design my own house, top of the list (well, right after the walk-in wardrobe!) will be underfloor heating, so that an ugly radiator never again dictates what furniture I can have!!!!!!
....and we were in need of storage for the "good" glasses and dishes, you know, the ones that you only use when you have people over and you want everything to match ;)
So we came up with a plan, working around the radiator (more on that in another post) and part of that plan was some open shelving.
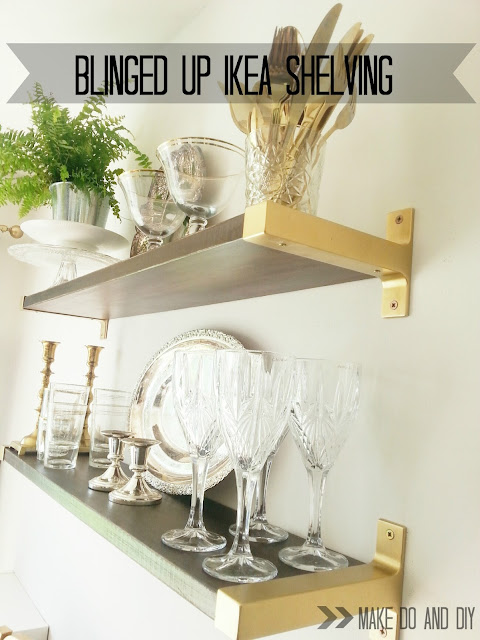
I had seen the Bjarnum shelves in a lot of my research on pinterest, and I loved the industrial look of them, and also that the brackets were so streamlined that they didn't take away the look of floating shelves. I wanted chunky, clean shelves, and this seemed to fit the bill. So I picked up two sets and gave them the usual coat of gold paint.
 |
| Gavin really wanted to leave them chrome but I overruled him, maybe I was wrong?! |
When it came to the actual shelves I knew I wanted dark, matt wood, to tie in with the dining table but also keep the slight industrial feeling we were going for, but Ikea didn't have anything that fit the bill. All their "wood" effect shelving was much too fake and laminate looking, and not even the right colour, so we decided we'd go to B&Q and pick up a piece of wood that we could cut down.
*the brackets completely cover the ends of whatever wood you're using so it doesn't have to be pretty, in fact I think they'd look amazing if you used some really rough pallet wood with them
Luckily for us B&Q happened to sell basic pine shelves in exactly the size and thickness we were looking for, so that saved us a bit of work.
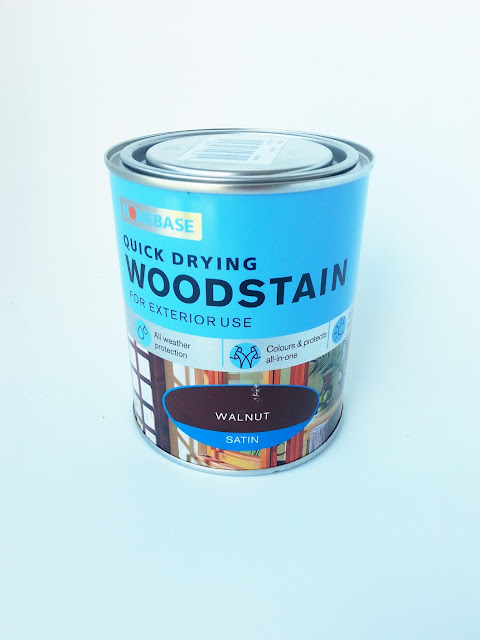
We (Gavin!) stained them with this.....
 |
| In all honesty I was merely creative director on this project, Gavin did all the work! |
After one coat.....
After two coats the edges were roughed up a bit to give them a "lived-in" look.
And there they are!
I love, love, LOVE them. I can put all my shiny charity shop finds that I gather, magpie-like, on display, and having shelves high up on that wall really draws your eye up and make the room look taller. It's amazing how sometimes putting something into a room makes it look bigger!
Both shelves cost us €50 total, and now I'm looking for other places I can use them, and maybe let Gavin have his chrome version!
As soon as we finish the last little bit of the rest of the "unit" we've come up with for this wall I'll get a post up on it ;)
Tell me what you think!!
Linda xx
Wednesday, 13 May 2015
Super simple Ikea Rast hack
I love Ikea.
Like really love it.
Like as in have its functional, reasonably priced babies love it.
During the two years when we were trying to buy a house I spent a lot of time thinking about how I wanted our house to look, and what I wanted to fill it with. Unfortunately we weren't going to have the budget to just buy whatever we wanted straight off, we were going to have to be creative! We were going to have to find pieces that were inexpensive, but still stylish and decent quality, and to my mind you can't really beat Ikea for that.
So I had spent quite a lot of time on the Ikea site, and also on pinterest, checking out what was available and what could be done with it....and one thing that kept cropping up was the humble Rast dresser and the many things that could be done to it to jazz it up, from basic painting and staining to more adventurous ideas like adding mirror or overlays.
The Rast is solid raw pine and is priced at €25.....yes €25!! That's a fantastic price for solid wood furniture, and the fact that it's unfinished is the biggest selling point for me as it leaves you with unlimited possibilities as to what you can do with it, bedside table, hall table, dining room sideboard, the list is endless.
What we really needed was extra clothes storage in our bedroom, so we decided to buy three Rasts to go along the big blank wall beside the bed, where there was a slight alcove that they would fit into perfectly.
As the room was painted a dark grey all over I decided to stick to bright white and gold as the colours for the furniture, curtains and bedding to stop the space feeling too dark. With that in mind I wanted to paint the dressers glossy white, with gold cup pull handles and gold brackets on the corners of the drawers.
So I removed the original handles (and kept them, cos you never know...) and filled the holes with wood filler, let it dry and then sanded it flush with the wood.
I then painted everything with one thick coat of this....
...which was a big mistake! It stank to high heaven, took 3 days to dry and had a really disappointing finish. Lesson learned, if something seems too good to be true, it probably is. There really is no way to cut corners if you want a good paint finish. If I was to do it again (and I will, cos I want two of these together in our entryway) I'd give them a serious sanding first, coat them with this primer.......
.....and then do 2-3 thin coats of a water based white gloss to finish them off, giving another light sanding with very fine sandpaper just before the last coat to make sure to end up with a really glossy finish. In the long run I know it'd give a much better result.
...and these corner brackets

(2 inch flat corner right angle bracket/brace-again I got them on ebay as it was much cheaper, around €10 for 50 of them) and sprayed them with my trusty rustoleum bright gold spray paint, and once they were dry Gavin attached them.
And here you have them!
Despite the poor paint finish I really love them, and they currently store all of Gavins clothes so they're really functional. Despite the mistakes I made it was a relatively simple project and I'd expect that the next time I do this it would only take a few hours, total.
Ever attempted an Ikea hack? I'd love to hear about it in the comments ;)
Linda
Sunday, 12 April 2015
What a difference a spray makes....
Let me introduce you to my best friend.....
.png) |
| hey girl...... |
This is my go-to, absolute favourite type of gold spray paint, and I've used it on an embarrassing amount of stuff in my house! In my opinion gold is a neutral (don't disagree, I will fight you on this!), and I often pick up accessories etc in charity shops that I paint to freshen them up and make them match my other decor, and this is by far the best one. It's really bright and shiny, and a nice deep antique-y type of gold that's really beautiful.
So when I needed a side table for my sitting room (we don't have room for a coffee table in front of the couch so we use side and occasional tables instead) and picked up the Klingsbo metal and glass one from Ikea for €30, it didn't take me long to decide to give it the spray paint treatment.
The original black wasn't offensive or anything, but it was too harsh with my colour scheme of gray/white/pink, and I had also seen many beautiful pics of metal work Ikea pieces that had been spray painted gold on pinterest and absolutely loved how glam they were, so I was itching to try it!
So I started with this......
And two quick coats of spray paint later I had this.....
I think it makes a huge difference, and really brings out the detail in the metal work underneath. It's added a little bit of luxury to my living room :)

What about you? Have you ever "hacked" something from Ikea? Used spray paint to make something fit a room better?
Linda
Wednesday, 8 April 2015
Easy diy headbord cover-up
So a few weeks after we moved in our bedroom looked like this........
I feel like that photo speaks for itself. The puke green walls were bad, but add the too short curtains, tacky white pleather bed and cold, cheap laminate floor and you're not looking at the best nights sleep you've ever had in your life!
So clearly something had to be done, and urgently. My bedroom has always been a place I like to retreat to, somewhere cosy and comfortable that I can close the door of and relax in. It's somewhere I've always tried to keep "adult" no matter how much kid-plastic makes it's way into our home.
With this in mind our bedroom was top of our list for a quick makeover when we moved in....quick, because baby number 2 was due 5 weeks after we got the keys to this, our first house!
We started by painting the walls a deep grey. This may seem like a dangerous choice for the first room we had ever painted, but I'd spent so long thinking about the colours I wanted in my house and researching options that I was pretty sure I would be happy with my choice. Also, our bedroom is at the front of the house, which never gets any direct sunlight through the windows, so I thought "why fight it?", this room was never going to be filled with light, and to be honest I'm a fan of a cosy, cave-like bedroom anyway, so a dark colour should fit the bill. So after looking at many paint chips in the room I settled on a colour called clockhouse by colourtrend, and I love it! It really makes the white and gold of the rest of the furnishings really stand out, and it's such a neutral that I can swap out the accessories really easily.
After the paint we needed some furniture, so we hacked some ikea rast dressers and argos nightstands, adding white paint and gold hardwear to glam them up, and hopefully make them look a lot more expensive than they are ;) I painted some pictures to go above the nightstands, and made the diy sunburst mirror for over the bed. I also hung floor length white curtains from ikea and swapped the curtain pole for a gold one that was in the playroom downstairs.
And then we had the bed.......
The bed is awesome, in that it has a very comfortable memory foam mattress and the whole top is spring loaded so it lifts up really easily to get at everything stored tidily (and dust-free!) beneath, but......it's butt-ugly. White pleather may be fine on the base, but the headboard is awful, too short, has a strange curve to it and is covered in an awful material. Normally this wouldn't be a problem, just get rid of it and hang a new one on the wall behind the bed right? Wrong! The thing was part of the frame of the bed...which is made of metal, so in other words it 'aint going nowhere.
And this is the part of the story where the husband steps in, all McGuyver like, and says he's going to come up with something to sort it out, and lo and behold, a couple of days later he presents me with this.......
"This" is basically a piece of plywood, cut to size, with three batons attached to it that will slot between the existing headboard and the wall, holding in braced in place without using any other means of attaching it (makes it really easy to remove or change out the fabric too). It's ingenious! It mean the headboard now sits a foot higher, with the new piece just resting on top of the existing one, held in place by the batons, it's totally solid but also non-permanent! (makes it a great option for those renting too)
So now that I had this great new headboard extension I just needed to cover it in a great fabric to complement the room. I wanted something with a soft white background, and a graphic, floral print that was also modern. I finally found what I wanted in Ikea for €8 (I think) a metre. It's great quality, heavy weight fabric, bargain!
I laid batting that I got in Hickeys over the plywood and stapled it on with my trusty staple gun. I then lined up where I wanted the pattern to fall on the headboard and stapled that on at the top and sides.
The whole thing was then slotted over the existing headboard, and the extra fabric fell down over it and covered it. I then attached this with a few staples to pull it tight.
And there you have it!

A brand new look for the room for a total cost of around €35, and the best thing is if I decide to change the room around all I have to do is pull out a few staples and I can have a new headboard in about half an hour, and the old fabric will even be re-usable :)
I'm really happy with it, I think it really changes the feel of the room, the extra height makes the bed look much more luxurious and hotel-y, and I love it!


What do you think?
Linda xxx
Visit Linda's profile on Pinterest.
Subscribe to:
Posts (Atom)
-
Hi, I'm Linda
- Welcome to my blog! I'm a new home owner trying desperately to turn this place into our dream house...on a tiny budget. Join me as I attempt to up-cycle, diy and spray paint my way to a stylish home!
Search This Blog


