I feel like I've been promising this post forever, but in my defense my kids sole reason for being seems to be to thwart me. Better late than never right? Right?!
So lets get on with it shall we, before some poo-related catastrophe get's in my way? Lovely.
To give a quick re-cap, we only had a couple of definite requirements when we were looking for a house, and one of them was that we wanted a room downstairs that we could use as a playroom. Given the fiasco that was our journey to house-ownership we were lucky to end up with exactly what we wanted, a house with a nice little room off the kitchen/utility where we could shove the kids and all their hideous plastic monstrosities and pretend that they didn't exist! For a while anyway.
Now, while we were delighted to have it, it wasn't exactly inspiring. I don't have a picture of it from the very start, but this is it just before I really started the bulk of the makeover. I had already painted the door from it's original fake wood.
 |
| Ugh |
 |
| Bleugh |
 |
| Yuck. Hi Elliott! |
However, as the kids were still so small and not really into playing on their own yet it just wasn't a priority and it was basically just used for storage for a while....but fast forward to a year later and I was ready for them to have a place I could send them and not feel bad about it! I wanted somewhere that would entice them to peel their sticky little fingers off my clothes and possibly, actually play without me long enough for me to completey finish a cup of coffee without having to microwave it or down it like a jaegerbomb. So the makeover was on.
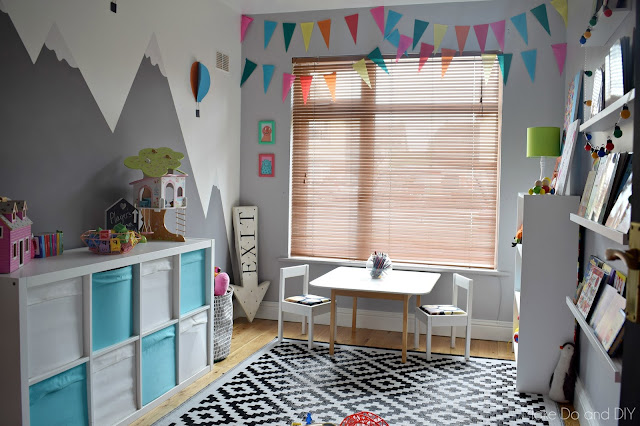
As always, paint was the first step. I painted three walls in Crown "Cloudburst", a lovely warm grey, and one wall "Sail white", the same colour I used in my kitchen. Then I painted a really simple mural of mountains in Colortrend "Clockhouse", which was left over from the bedroom....and kitchen. I get my money's worth people!!!
Just a note, I'm really not thrilled with the quality of the Crown paint, it doesn't cover particularly well and it doesn't seem to be very robust either, wheras the Colortrend colour (which I had mixed in Fleetwood paint) went on really well and seems to be much hardier. I won't be going with Crown again. The colours are great but I'd get them mixed in something else.
To paint the mural I just outlined a few triangles with frogtape, painted over them and removed the tape while the paint was still wet to get a nice clean line. I love these mountains, they're kid-friendly, but not childish. Kid stuff is so freaking loud most of the time, and I did NOT want to be sitting sipping pretend tea in a room that gave me a headache, so I figured a nice, calm, neutral background would make the kid colours pop without letting them take over the room.
I also found those cute cloud shelves in Tiger, love them :) And Em and I made the balloons together one rainy Max-naptime.

I wanted to add in some really bright colour, and a trip to Tiger took care of that! I picked up a pack of tissue paper confetti for €1 and stuck them all over this wall with kids art paste. Took an hour, really easy to do, and it'll be really easy to remove when I want to paint in here again.
I also painted the radiator with a tester pot of Valspar "Sweet Orange". I hate radiators, but I've decided to deal with them by painting them to make them part of the scheme. You can't hide them, may as well make a feature of them!
The door is painted with chalkboard paint, perfect for playing school...or Banksy.
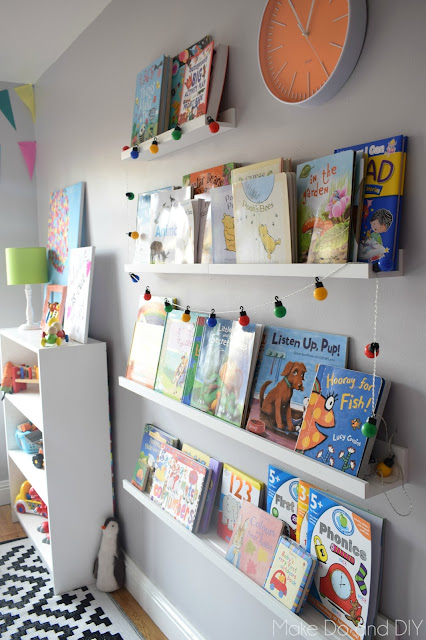
I took the Billy bookcase from Em's room (she didn't need for books any more, she just keeps a little stack of her current favorites by her bed) and jazzed it up with some bright wrapping paper on the back.
I (ahem, Gavin) added a new top to the Latt table and chairs that was already in here. The table originally had a lip on it that gathered dirt and made it really hard to clean, and anyway it wasn't big enough for two kids to spread out their stuff on it, so Gavin pulled a bit of leftover plywood out of the shed, curved the edges to prevent eyeball loss, and screwed it to the table top. I then sanded and painted the whole set, and upholstered the chairs.
 |
| Of course it's always this tidy! Bahahaha!!! |
I (ahem, Gavin) added a new top to the Latt table and chairs that was already in here. The table originally had a lip on it that gathered dirt and made it really hard to clean, and anyway it wasn't big enough for two kids to spread out their stuff on it, so Gavin pulled a bit of leftover plywood out of the shed, curved the edges to prevent eyeball loss, and screwed it to the table top. I then sanded and painted the whole set, and upholstered the chairs.
 |
| I LOVE this fabric! |
The rug is the indoor/outdoor one that has previously lived in both the living room and the dining room. It's pretty much indestructible, so the playroom is it's spiritual home. I love the graphic black and white in here, it's interesting enough that the kids like it, and it satisfies my need for some "grown-up" pieces in here.


The bunting is from Tiger, and was €1! I think it adds interest on this wall, and stops the window looking too bare with no curtains. I toyed with the idea of making a faux pelmet type thing, but it would just block light so I ditched it in favor of the bunting.
It didn't need much art in here, what with all the detail on the walls and the front-facing books, but I did make these cute little "Up" inspired pieces for over the bookcase. I made the balloon one out of the same confetti as I used on the wall, and the other I just drew with some sharpies.
 |
| I wanted to keep the middle of the room clear for playing, so I kept all the furniture to the edges. |
The Kallax unit we already had in here still looks great, and it holds an unbelievable amount of toys! Which I attempt to keep organised, but I have an idea to print out pictures for the front of each basket so the kids can at least try to tidy up by themselves soon.
Finally, a cute little laundry basket i picked up in Tiger holds all the dolls and teddies.

So there you have it! It's a small, narrow room that doesn't get a lot of direct light and it's tough to photograph, but I hope I've given you some idea of how much better it is now!
If you're interested in the cost, here's the breakdown:
Things I bought
Paint-€45
Ribba ledges-€35
Lampshades-€15
Clock-€10
String lights-€6
Confetti, bunting etc-€5
Frames-€20
Material-€8
Upholstery foam-€5
Laundry bin-€6
Cloud shelves-€7
Coat hooks-€10
Things I already had
Kallax unit-€55
Storage boxes-€24
Billy bookcase-€40
Rug-€90
Latt table and chairs-€22
Cork boards-€10
Plywood-€10
So it cost me under €175 to makeover this room, and if you were to start from scratch the whole thing would have cost under €425! Bargain!
The sprogs love it, and I must admit I put up less of a fight when I'm asked to come and play dolls now! What do you think?
If you liked this post, you might also like:


