Happy Monday everybody! This post was due to be all about Max's room, full of pretty pictures of the finished product and all the nice little things in it. And then this happened......
I made the mistake of taking my eyes off Emilia long enough to actually go to the bathroom by myself the other day (selfish, I know) and when I came out I was greeted with this. Fluorescent pink highlighter all over the lovely wall I JUST painted.
I'll say this much for her, she knows how to hit you where it hurts!
 |
| Killer of dreams, eater of souls, destroyer of walls. |
So, after giving her the evil side-eye for a while and imposing a particularly emphatic time-out on her I was ready to forgive and forget.. Once I go back and paint over the pink again of course *sigh*.
This post is therefore going to be about another project I got done just last week. My dad took the destroyer to a party that his family was having ~not depressed at all about the fact that my toddler has a better social life than me, nope, no sir~ and she stayed overnight so the next morning had a kind of holiday atmosphere here with just one, non-talking child to look after! I watched Judge Judy, I drank entire cups of coffee while they were still hot, I went to the bathroom alone...and then I decided that I should really get something done that I've been meaning to do for ages but had put off cos I needed to do it when she wasn't around and I hadn't been able to muster the energy in the evenings.......
I painted the rug for her room!!!!
So painting a rug may seem like a strange thing to attempt, but hear me out!
I feel like there's some sort of weird conspiracy going on when it comes to buying rugs here in Ireland. I see all these gorgeous, affordable rugs on pinterest which inevitably come from shops that I don't have access to, and then when I go to look for something similar that I can actually get my mitts on it is either:
a) Tiny.
b) Not in any kind of print anyone with functioning eyeballs would want to be subjected to.
or
c) So expensive that you'd have to take out a loan to buy it, and then be stuck with it forever cos you paid so freakin' much for it!
As you can imagine, none of these options were going to work for me.
I am both a possessor of eyeballs and someone who constantly changes their mind about what I like so "b" and "c" were right out.
So I did what I usually do...I typed "diy rug" into pinterest, and as usual, it told me to use paint! So I reckoned it was worth a shot. The rug was for Em's room so it wasn't like I would have to look at it too much if it was hideous or anything ;)
I already had this ugly rug that I bought in Ikea last year. It was a panic buy.
I'm slowly, s l o w l y learning that I do not have to make purchases even though I can't find what I want just because I "need" something. Last time I checked no-one takes your kids away cos they've come into contact with naked floors!
I had gone with the intention of buying a softer, patterned grey rug for the living room, but when that was sold out I picked this up cos it was the right size and a neutral colour, and cheap (€60) so I figured it'd get used somewhere. Turns out it was actually a really ugly grey/brown, nothing like the nice sisal rug I already had and thought it was similar to. Also, it stained REALLY easily, not good.
So long story short, I hated this rug anyway, so it didn't matter if the project didn't go to plan.
Basic rule of thumb when making decorating decisions~you can't ruin something you already hate people, take a chance!
It was such a rough fabric/tight weave (not sure how to describe it really) that I thought it would take paint perfectly, plus I was pretty sure that since it was already on the rough side the paint wouldn't be noticeable underfoot.
 |
| Stains! Stains everywhere, and this was after I tried to clean it! |
So I gathered up different paints, enough containers and brushes for the colours I wanted to use and some fabric medium that I had already from making curtains (tutorial coming soon, I promise) and I got to work.
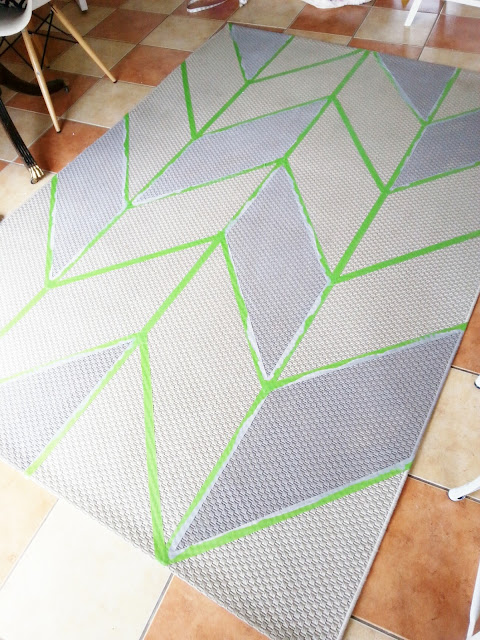
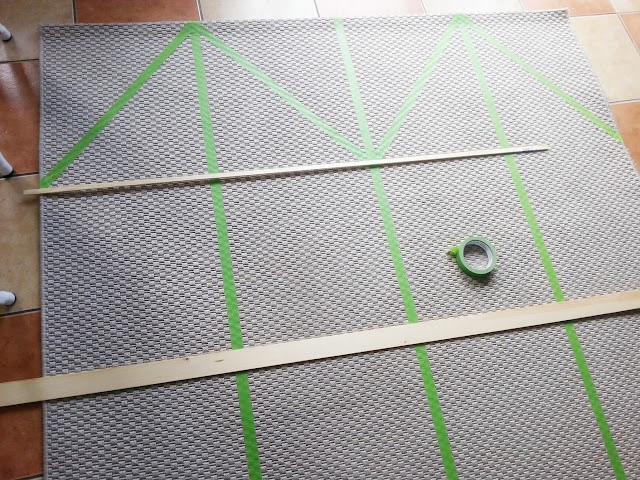
First, Max did the math and figured out that four sections across and five down would look best (I wanted a large pattern). So we divided the width (160) by four and saw we needed to tape off every 40 cm. The tape was exactly 2cm wide so we taped from 39-41 cm, 79-81 cm and 119-121 cm to make sure it was even. The weave of the carpet was in little squares, two of which were exactly the same with as the tape and ran in straight lines down the rug, which was very, very satisfying for someone who likes precision....but is usually in too much of a rush to get it!
I laid a strip of wood across at the 46 cm point (230 divided by 5) so I could lay the next pieces of tape corner to corner without measuring each time, make sense? You're basically just making a lot of large triangles.
About an hour in it was all taped up and ready for paint. At this point I almost convinced myself that I liked it with the tape on and I should just stick with that....I am so impatient.
I quickly went back over the points where the tape crossed over and cut away any excess to make sure I'd end up with crisp lines. i also went back over everything and made sure it was all pressed down properly.
 |
| Tip-use the roll of tape to go back over your lines and rub them down to stop the paint bleeding-it's the exact same width so you won't miss anything |
Then I mixed up the colours I wanted using some fabric medium and regular wall paint I had left over. I'm not sure how beneficial fabric medium was for this project cos it's not like it's ever going in the washing machine, but it did make the paint dry a bit softer than it would have been I think. Plus, it's no harm to have it for when I inevitably have to try and scrub stains off the rug later.
 |
| I bought the delta one online and the other one in a craft shop. The Berol is much cheaper and doesn't smell odd like the delta so I'd definitely go for that again. |
So I started applying the paint, and as per usual I didn't have a definite plan for what colours would go where, I just knew I wanted more grey and white than pink and mint, and I wanted the colours spread out fairly evenly.
 |
| Ack, those thiles. The more I see those them in photos the more I hate them. Your number is up tiles, I'm not putting up with you much longer, you will offend me no more! |
Once I finished all the colours I pulled off the tape and let the whole thing dry. It took two days to be fully dry, quite a lot of paint soaks into the fibres.
 |
| Still damp |
So there you have it. I'm pretty pleased with it all in all, it brings a bit more pattern and colour to Emilia's room that I could tailor exactly how I wanted it, it didn't cost the earth, and if I want to change it in six months I won't feel guilty about it. I think I'll even do this again to make a rug for the dining room.
Now, as usual I did things wrong and made mistakes that could have been avoided if I'd just thought a bit more beforehand and had reigned in my impatience to get started...but hey, I'm too old to change at this point. Luckily though I can impart that hard-earned knowledge to you so you don't do the same! So here you go....
1) The fibres will soak up a LOT of paint, make more than you think you'll need, even adding just fabric medium will change the colour slightly so if you try and make up another batch it won't match and you'll end up with patchy bits.
2) Don't remove the tape until you are completely finished painting-if you try to touch up parts after you won't be able to go right to the edges and again this will turn out patchy.
3) If you need to add more paint, apply it to the whole section, not just the part you think needs it-again with the patchiness.
All these things happened to me and I did end up with patchiness in some areas, but I was going for more of a faded/imperfect look rather than having super saturated colour in the hopes that stains/wear and tear won't show so much, so I'm ok with it. But if you want perfection, just do as I say, not as I did ;)
What do you think? Have you ever painted something that wouldn't normally be painted? Let me know in the comments!
Linda xx
If you liked this post, you might also like:


